| Adding categories to multiple contacts Advancements in e-mail 
Advancements in Mail Merge
Auto-Update from Main 
Blast E-Mail
Categorizing Projects
Consolidated Mailing 
Duplicating Records within a Project
Editing your Itineraries
Importing Data from Bacon's
Importing Data into a Project
Invitation Lists
New Codes
Organizational Record 
Organizational Report
Printing Call Sheets by Market
Project Search
Publishing Mail Merge Letters
Quick Confirmation Letters

Reverse Send
Searching by Date of Entry
Title Standardization
Timed Notes
Updating PA2000 |
|
Auto-synchronize
The data in your lists is independent of
the data in the Main Media. When you are ready to use your projects – for mailing
lists, callsheets, etc. – you may want to compare your contacts to those in the Main
Media Data. Auto-synchronize is a quick way to see the differences between the contact
information contained in individual projects and that of the Main Media Data. To use this
feature:
Open a Project List.
Select the second tab (i.e. reviewers, contacts).
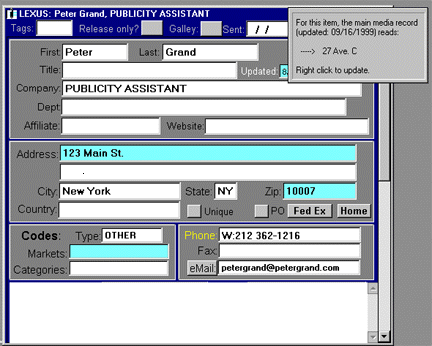
Open the first record in the Project List. Blue highlights allow
you to easily identify differing fields between the Project List and the Main Media Data.
(Fig. 1)
Place your cursor over any blue highlighted field. A pop-up
window will appear telling you what information is in this field in the Main Media Data
and when this contact record was last updated. (Fig. 1)
Fig. 1
Hint: First sort your contacts and scroll to the top to find the
first record.
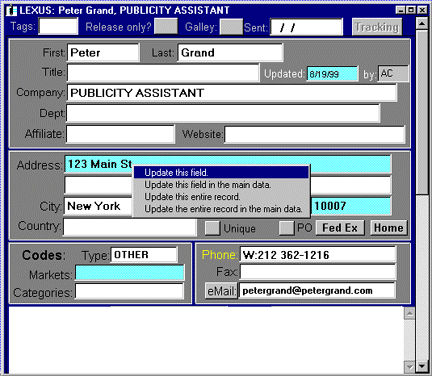
To update this contact record right-click on the blue
highlighted field you wish to change. A pop-up window will appear that gives you four
choices: you can update this field; update this field in the main data; update this entire
record; update the entire record in the main data. Click on a selection. (Fig. 2)
To move on to the next record use your Page Up and Page Down
keys on your keyboard.
Fig. 2
Hint: Use the "Updated" field to determine which
record is more recent.
For more information on how you can have
this or any new feature as part of your Publicity Assistant 2000 system, contact us. |