Adding a Single Reviewer
Adding a Single Reviewer
Transferring a Reviewer from the Main Media Data to a Review List
The most common way to add a reviewer to Review Lists is to send it from the
Main Media Data. This is a very powerful feature that allows you to put
individual names, collections of names, or the results of searches into a project
list. There are two ways to do this, depending on whether or not you want to send
the contact to an open list.
To bring in an individual to an open list, perform the following steps (to
send a contact to multiple lists, see the following section ):
- Be sure that your project is open. To do this, first select the Review Lists
tab of the main Publicity Assistant 2000 window. Next, select the project name
by clicking on it once. Then type enter on your keyboard. For more
information on opening a project, see Opening Projects.
- Select the Main Media Data tab from the main Publicity Assistant 2000 window.
If the main window is not visible, go to the Window menu and select Publicity Assistant 2000. (It is important that your project list be visible behind the Main Media
Data window. You may wish to resize your windows so that both the project and
the Main Data can be seen.)
- In the Main Media Data, find the name you wish to add to your Review List.
From here, you have two options:
A. Drag the contact from the Main Media Data to your Review List. Drag it to any
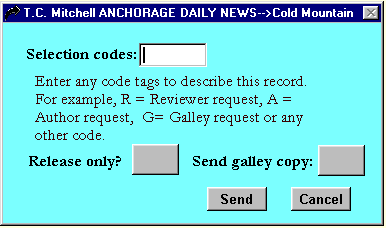
visible area of the review list. When you release the mouse button, the send
options window (see figure below) will appear. Make your selections and hit
send. The project window will move forward and the name will be added to your
list.
B. Or, click on the name. Press the Send button on the toolbar. Alternatively,
you can typing control-n on your keyboard. The send options window (see figure
below) will appear. Make your selections and hit send. The project window
will move forward and the name will be added to your list. If you have more than
one project open, you will be prompted for the project to which this contact
should be added.
- The figure below is the send options window. It will appear when you send
records from the Main Media Data to a Review list. (The send options window will
not appear when sending records to a Promotional Tour or Special Project.)
Here, you may enter selection codes. You may also tag the reviewer as a recipient
of only press releases, or of bound galleys, by clicking on the appropriate
boxes. Alternatively, you may elect not to add any codes or tags. Either way,
press the Send button on the window to send the reviewer to your list. For more
information, see Selection Codes.

- Confirm that the contact has been added to your Review List by selecting the
Reviewers tab of your Review List’s window:

You may also send a single reviewer to multiple lists by using the send box.
To use this feature see, Sending contacts to multiple lists.
For more information on Review Lists, see:
Creating a Review List
Adding a Group of Reviewers to Review Lists
Adding a one-time Reviewer to a Review List
|