Publishing Version |
Publishing Version |
Selection CodesSelection codes are used to mark reviewers for Review Lists with certain information. For example, if an author requests that a reviewer receive a book, you may wish to mark this reviewer with an “A” to indicate “Author request.” Another common code is “R” for “Reviewer request.” Selection codes should be limited to one character, but they can be more. Multiple selection codes can be entered for each reviewer. Your organization should decide on a set of standard codes to use. In addition to “A” and “R”, you may wish to use codes to indicate galley requests, high priority requests, or anything else you can think of. There are two ways to enter selection codes. The first occurs when you send or drag an individual to a Review list. The following window appears: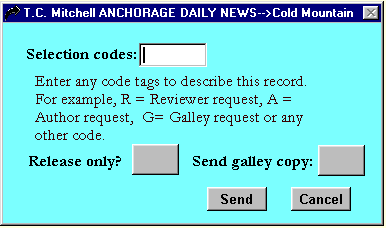 At this point, you can enter any selection codes you like before sending the
reviewer to your list. You also have the opportunity to mark as the reviewer as
the recipient of only press releases, or of bound galleys. When you are ready
to add the name to your list, press the send button. Note: You need not
enter any codes. To simply send the name to your list, press the Send button in
the window.
The second way to enter selection codes is to access the reviewer directly in
your project. If you send multiple reviewers at a time, you will not be prompted with the
above window. You can still enter selection codes by using this second
method. You can also use this method to enter or change the selection codes of any
reviewers already in your project.
To change the selection code from within your project, first open your Review
List (see Opening an Existing Review List for details). Using the spilt screen function and the horizontal scroll
bar, scroll the right side of the spilt screen over until the Selection tags
column becomes visible.
At this point, you can enter any selection codes you like before sending the
reviewer to your list. You also have the opportunity to mark as the reviewer as
the recipient of only press releases, or of bound galleys. When you are ready
to add the name to your list, press the send button. Note: You need not
enter any codes. To simply send the name to your list, press the Send button in
the window.
The second way to enter selection codes is to access the reviewer directly in
your project. If you send multiple reviewers at a time, you will not be prompted with the
above window. You can still enter selection codes by using this second
method. You can also use this method to enter or change the selection codes of any
reviewers already in your project.
To change the selection code from within your project, first open your Review
List (see Opening an Existing Review List for details). Using the spilt screen function and the horizontal scroll
bar, scroll the right side of the spilt screen over until the Selection tags
column becomes visible.
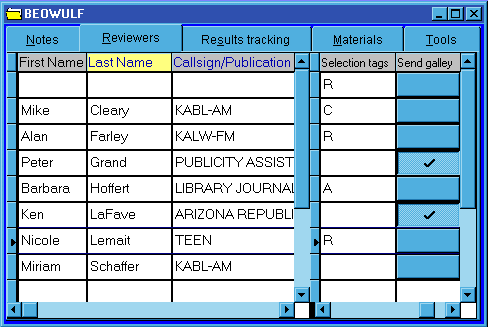 Enter or modify selection tags for a contact directly in the Selection tags
column. Remember that you can select the contact you wish to change by clicking
anywhere on his or her record. The record indicator arrow then keeps track of
which record you are currently on.
Your changes will be saved when you next close your project.
Enter or modify selection tags for a contact directly in the Selection tags
column. Remember that you can select the contact you wish to change by clicking
anywhere on his or her record. The record indicator arrow then keeps track of
which record you are currently on.
Your changes will be saved when you next close your project.
|