Entering and Modifying Bookings
Entering and Modifying Bookings
Once you have created a new Promotional Tour project in Publicity Assistant
2000, you will want to start adding bookings. The first step is to add contacts
to your project that represent the organizations with which you wish to
arranged bookings. For more information on these procedures, see Creating a New Promotional Tour and Adding Contacts to Promotional Tours. After you have added the desired contacts, you are now ready to enter
bookings.
First, open your project and select the Contacts tab. You will now see a list
of all the contacts you have added to your project. Open the record of the
contact with whom you would like to record a booking. You can do this in one of
three ways:
- Double click on the record
- Click once on the record and press the Edit button in the Toolbar.
- Drag the record onto the light-blue background screen of Publicity Assistant
2000.
The contact record will open:
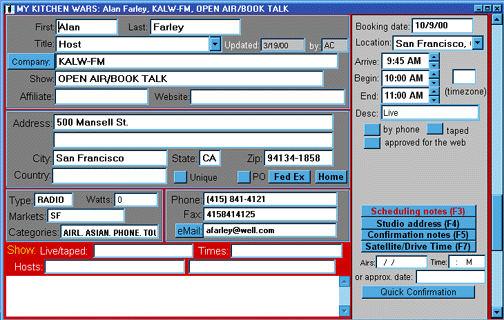 You will notice that the left side of the window contains all of the contact
information and the right side is used to enter scheduling information. Each
field is optional, except for the Date field at the top. This field is needed to
register a booking as part of an itinerary or a report. Below is a detailed
view of the scheduling window with a description of each field. Enter
information into each field as desired:
You will notice that the left side of the window contains all of the contact
information and the right side is used to enter scheduling information. Each
field is optional, except for the Date field at the top. This field is needed to
register a booking as part of an itinerary or a report. Below is a detailed
view of the scheduling window with a description of each field. Enter
information into each field as desired:
 Pop-up Windows:
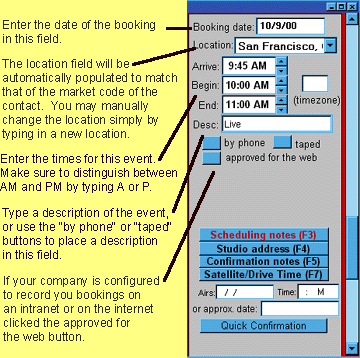
- Scheduling Notes: Use scheduling notes to enter information pertinent to the booking. For
example, you may use these notes to remind the author to bring copies of a book.
Scheduling notes appear in printed itineraries. You can access the scheduling
notes by either pressing this button, or using your F3 key while the scheduling
window is active. A window will appear allowing you to enter text. To save
the text, close the window using the “X” in the top right corner of the window, or type control-end. Notice that the
button is red indicating that information is being stored.
- Studio Address: Allows you to enter an address for the booking that differs from the contact’s address. When you press this button (or press the F4 key), a window appears
prompting you to enter the studio address. Type in the address of the
booking, and close the window using the “X” in the top right corner of the window, or type control-end. On itineraries,
the contact’s address will appear. If you enter a studio address, this address will
appear in lieu of the contact’s address. Notice that the button is red indicating that information is being
stored.
- Confirmation Notes: Pressing this key allows you to enter notes regarding the confirmation of a
booking. These notes will then be accessible to you in the mail merge design
mode of Publicity Assistant 2000. You may opt to use these notes to write an
individualized message to your contact. Then using mail merge design mode, you
would add this field to your confirmation letters and other mail merge letters.
Notice that the button is red indicating that information is being stored.
- Satellite/Drive Time: This feature is used to assist in managing satellite bookings. When you
press this button, the following window appears:

You can use this to keep track of each interview during a satellite booking.
To enter information, simply click in the appropriate field. All information
is optional. When you have entered your booking information, close the window
using the “X” in the top right corner of the window, or type control-end. Your information
will be saved. Notice that the button is red indicating that information is
being stored.
- Quick Confirmation: This feature allows you to print a confirmation letter for each individual
booking from the contact record with in a Promotional Tour project list. The
information contained in this booking will be filled into the pre-designed form.
There is a media confirmation form and a bookstore confirmation form. When you
press this button, the following window will appear.
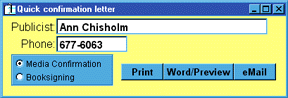
Fill in the publicist name and phone number. Select either the media
confirmation letter or the bookstore confirmation letter. You may send the form
directly to the printer, you may send the form to word or you may e-mail this contact
directly.
To save this booking simply close the box and this booking will be added to
your Itinerary. To view your booking at a glance select the Itinerary tab.
For more information, see:
Viewing Your Bookings
Editing your Itineraries
Printing Itineraries
Generating Confirmation Letters
|