Adding a Contact
Adding a Contact
Adding a contact into your Main Media Data is easy - just follow these steps:
- Select the Main Media Data tab of the main window.
- Press the add button in the toolbar. Alternatively, you may type control-a on
your keyboard. The following screen will appear:
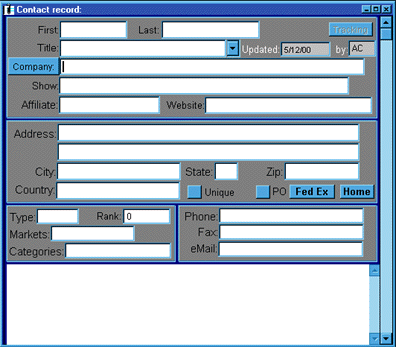
- Enter the contact’s information. Each field is optional. You only need to enter a single piece
of information to save the record. Following is a description of each field:
- Updated, By: Click in this field to record the date on which the record was entered, and
the publicist who entered the date. This information may be changed. It is
initially populated with today’s date, and the default publicist initials set in the options.
- First, Last, Title: Enter the contact’s information.
- Callsign, Show, Affiliate: Enter the name of the contact’s callsign or publication, show name, and affiliate. Use the
callsign/publciation field to enter callsign or publication name. For example, if your contact
writes for The Boston Globe, enter Boston Globe in the callsign/publication
field. If she has a column called “About Town,” enter that as the Show. TIP: Do not use “The.”
- Website: If your contact has a website address, enter it here. You will notice a
button next to contacts whose website information has been entered. Your system
can be configured to directly access a contact’s website by pressing this button.
- Address, City, State, Zip, Country: Enter the contact’s information.
- Unique: Check this box if this address is different than the Standard Address.
- PO: Check this box if the delivery address is a Post Office Box. You will then
be able to distinguish this later when creating mailing labels or shipping
disks. Many carriers, such as UPS and Federal Express, do not deliver to PO Boxes.
- Fed Ex: If the contact’s address is a Post Office box, you will need to enter a physical address for
them to receive Federal Express or other freight services packages. Clicking
on the Fed Ex button allows you to enter a physical address.
- Home: This box gives you a place to store an additional address. For example, if
your contact has a home address in addition to a work address.
- Type: Enter the type of media (i.e. TV, Print, etc.) which this contact works
with. Publicity Assistant will display a list of all media types available. Make
your selection and the window will close automatically. Adding the TYPE of
media will make the “callsign” field in your record dynamic. For example: when the contact is coded for “Print media” the “callsign” field will change to Publication. When the contact is coded for “Online services” the field will change to Site. Radio and Television will remain callsign but
a set of fields will appear at the bottom of the record in which you can add
specific information about the show.
- Markets: Enter the market that this contact represents. You will be prompted to
select from a pre-defined list. When you have made your selection, type control-end
or the close window box in the top right corner of the window.
- Categories: Select the category or categories for this contact. Your organization will
have established a set of pre-defined categories, such as sports, women’s issues, politics, etc. When you have made your selections, type control-end
or the close window box in the top right corner of the window.
- Circulation, Rank, Hits, Watts: Enter the circulation of print media, the market ranking of television media,
the watts of radio media, and the online hits of online media. This
information can then be used as criteria in searching for contacts in the Main Media
Data. Enter the type of media first, and then type your circulation information
directly into the box. This field is dynamic and corresponds with the type of
media.
- Phone, Fax, email: Enter your contact’s information. When you click on any of these fields, the telecommunications
window will open. You have the option to input as many phone, fax and e-mail
entries as you like, and to designate one of each as primary. When you have
finished entering data, type control-end or the close window box in the top right
corner of the window. Notice that for contacts with e-mail information, an
e-mail button will appear. By pressing this button, an e-mail composition window
will appear. If your Publicity Assistant 2000 system is set up with direct
e-mail access, this feature provides an easy way to send e-mail to contacts. (For
more information see, Blast e-mail.)
- Save your contact information. To do this, either type control-end on your
keyboard, or select the close button in the data entry window. You can also save
individual contact records by paging up or down to other contacts, or by using
the scrollbar for this purpose.

Duplicate Records: If you are entering a new contact which has similar information to a contact
already in your system, position your mouse over the existing record in the
Main Media Data (do not open the record). Drag the record to any other line in
the Main Media Data window. Follow the on-screen prompts. For detailed
instructions, see Creating Duplicate Contacts. This process greatly speeds up inputting multiple contacts from the same
organization.
Note: After entering or modifying the contact’s information, we recommend that you click in the "Updated/By" fields in the
top right corner of the edit screen. These fields track the user who made the
most recent modification, and the date of that modification. When you click in
the field, the information is automatically updated based on the date of your
system, and your initials as set on the tools page "user settings". If you type different initials into the by field, the system will remember
and reuse the new initials.
For more information, see:
Modifying a Contact
Standard Addresses
|