Adding Contacts to Projects
There are two ways to add contacts to your projects
(i.e. Review Lists, Promotional Tours, and Special Projects):
- Enter a new name directly into your project, or
- Import a name from the Main
Media Data.
This section provides a generic though detailed description of adding contacts to
projects. For more specific instructions on adding contacts to either Review Lists or
Promotional Tours, see either Adding
Contacts to Review Lists or Adding
Contacts to Promotional Tours.
Entering a New Name Directly Into Your Project
If you have a contact you would like to add to a project, and that contact does not
have an entry in your Main Media
Data, you may enter the information directly into your project. However, if there is
any chance that you will re-use this contact, you should enter it first in the Main Media
Data, then add it to your project. This will prevent you from having to re-enter all the
contact’s information with later use.
To Add a contact directly into your project, follow these steps:
- Be sure that your project is open. To do this, select the project by clicking on it once
(it will be highlighted in yellow) and then typing enter. For more information on opening
a project, see Opening Projects.
3 Select the Reviewers tab of the project window.
4 Press the ADD button in the toolbar. Alternatively, you may press control-a on your
keyboard. The following screen will appear:
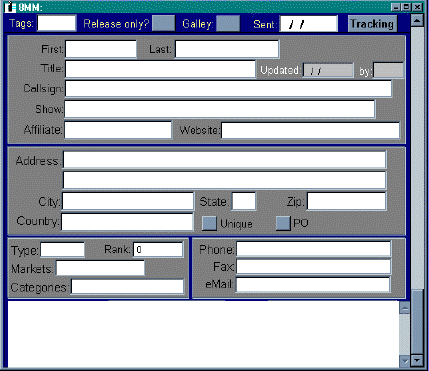
5 Enter the contact’s information. Each field is optional. You only need to enter
a single piece of information to save the record. Following is a description of each
field:
- Updated, By: Click in this field to record the date on which the record was
entered, and the publicist who entered the date. This information may be changed. It is
initially populated with today’s date, and the default publicist name set in the
options.
- First, Last, Title: Enter the contact’s information.
- Callsign, Show, Affiliate: Enter the contact’s callsign, show name,
and affiliate. An example might be WABC, Good Morning America, ABC. Use the Callsign field
to enter publication names. For example, if your contact writes for The Boston Globe,
enter The Boston Globe in the Callsign field. If she has a column titled “About
Town,” enter that as the Show.
- Website: If your contact has a website, enter it here.
- Address, City, State, Zip, Country: Enter the contact’s information.
- Unique: Check this box if this address is different than the Standard Address.
- PO: Check this box if the delivery address is a Post Office Box. You will then be
able to distinguish this later when creating mailing labels or shipping disks. Many
carriers, such as UPS and Federal Express, do not deliver to PO Boxes.
- Type: Enter the type of media (i.e. TV, Print, etc.) which this contact works
with. Your version of Publicity Assistant will either allow you to enter a media type free
form, or it will prompt you to select from a pre-defined list.
- Markets: Enter the market that this contact represents. Your version of Publicity
Assistant will allow you either to enter a Market free form, or it will prompt you to
select from a pre-defined list.
- Categories: Enter the category or categories for this contact. Your organization
will likely have established a set of pre-defined categories, such as sports, women’s
issues, politics, etc. Again, depending on your implementation, Publicity Assistant will
allow you either to enter a category free form, or to select from a predefined list.
- Circulation, Rank, Hit, and Watts: Enter the circulation of print media, the
market ranking of television media, the watts of radio media, and the online hits of
online media. This information can then be used as criteria in searching for contacts in
the Main Media Data. Enter the type of media first, and then type your circulation
information directly into the box. This field is dynamic and corresponds with the type of
media.
- Phone, Fax, email: Enter your contact’s information. When adding a contact
directly to a project, you may only add one number per field.
- Notes: You may add any notes in this field that are relevant.
- Save your contact information. To do this, either press control-<end> on your
keyboard, or select the close button in the data entry window.

Entering a Name From the Main Media Data
An alternative way to add a contact to your projects is to import it from the Main Media Data. This
powerful feature allows you to bring in individual names, collections of names, or the
results of searches.
To bring in an individual, perform the following steps:
- Be sure that your project is open. To do this, select the project name by clicking on it
once, then typing enter. For more information on opening a project, see Opening Projects.
- Select the Main Media Data tab from the main Publicity Assistant 2000 window. If the
main window is not visible, go to the Window menu and select Publicity Assistant
2000. It is important to be able to see your project behind the main media data
window.
- In the Main Media Data, find the name you wish to add to your project. From here, you
have two options:
A. Drag the contact from the Main Media Data to your project. Drag it to any visible
area of the project. When you release the mouse button, the name will be added to your
list. Your project window will move forward and the save and undo buttons will be
highlighted.
B. Click on the name. Press the Send button on the toolbar. Alternatively, you can
press control-n on your keyboard. The following window will appear:
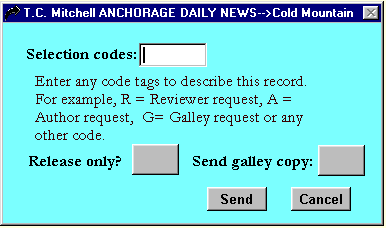
C. Make your selection and hit send. Your project window will move forward and the save
and undo buttons will be highlighted. If you have more than one project open, you will be
prompted for the project to which this contact should be added.
Entering a Group of Names From the Main Media Data
Pulling a group of names from the
Main Media Data to a project is very similar to pulling a single name. The only difference
is that you must select the group of names you wish to pull. Follow these simple steps:
- Open your project
- Press the Main Media Tab so that you can see your project window behind the main media
data.
- Press the Search button on the toolbar.
- Enter your search criteria. See Searching the Main Media Data for details.
- Press the SEARCH button in the search window.
- The results of your search will now appear in the Main Media Data section of the main
window. In the bottom left hand corner, you will notice the total number of contacts
resulting from your search. You will also notice that the search button in the toolbar is
highlighted red. This indicates that you are viewing the results of a search, not the
entire database. Note: To clear your search, simply press the search button once. The
red will disappear, and the information displayed under Main Media Data will be your
entire list of media contacts.
At this point, you have two options. You may either import the results of your search
into your project, or you may select individual contacts from your search results. To
import the entire results of your search, skip to step 7.
To select individual contacts from your search results, do the following:
A. Press the SELECT button in the toolbar. Notice that a new column of buttons appears
in the Main Media Data window.
B. Check-off the contacts you wish to add to your project. You may do this either
by clicking the buttons with your mouse, or by pressing the space bar. You may move up and
down the list with the arrow keys.
- To add the results of your search, you may either press the Send key in the toolbar, or
drag the results to your project. To drag the entire set of results (or the selected
contacts), position the arrow in the field name bar of the Main Media Data window:

Drag this bar to your project. The following window will appear:
- Make your selections and hit send.
Tip: If you change your mind about adding a contact or a selection of contacts,
press the UNDO button on the toolbar. If you haven’t yet saved your list by closing
it, the UNDO button will be highlighted in red indicating that you can remove all new
contacts since your last save.
See also:

Searching the Main
Media Data
Moving Names Between Lists
Adding a Contact to the Main Media Data |