Importing Data from Bacons
Importing Data from Bacons
Bringing data into Publicity Assistant from Bacon's involves two basic steps:
exporting list from Bacon's and importing that into PA.
In Bacon's:
- Select the power search button located on the Bacon’s tool bar. The power search box will appear. Make your selections and
select the build job button located on the Bacon’s tool bar.
- A window will appear with all the media contacts that meet your criteria. You
will notice two columns on the top of this page, selected fields and available
fields. Make your selection by using the right and left arrow keys to add or
remove fields.
Hint: The easiest way to choose the proper fields is to first remove all the
selected fields and then choose the fields in the order in which they will
appear in Publicity Assistant. For example, first name, last name, title,
callsign/media name, etc. This facilitates the import process.
- Next hit the update display button.
- Under the file pull down menu choose export, then export as displayed.
- You will be prompted to enter a name for you media list. Type in the name of
your list plus the extension .csv. For example, the file name will read religion.csv.
- Select the browse button to specify where you want to save the file. Make
your selection and save the file. The file name will be placed in the window with
the extra extension .txt. For example the file name will read religion.csv.txt. Delete the .txt and
save the file.
Importing into Publicity Assistant 2000:
The import feature in located on the tool’s page of each project. Press the import button. You will be prompted to
choose a file to import. Find your file and press the select button. The
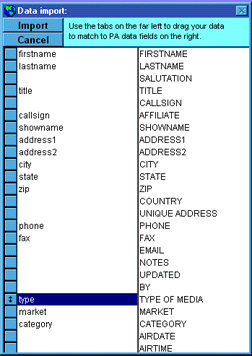
following window will appear:
 You will notice two columns. The Publicity Assistant fields are in the
right-hand column and the imported file fields are in the left-hand column. To
import this data, match the fields in the left-hand column (that is the fields you
wish to import) with the Publicity Assistant fields in the right-hand column by
dragging the buttons to the left up or down, so that first name is next to
first name, last name is next to last name, etc. You will need to insert bank
fields in order to align fields properly. To do this, drag a blank from the bottom
of the column and place it next to a field that is not occupied. When you
have all the fields aligned properly. Press the import button located at the top
left corner and the contacts will be added to your project list. These
imported contacts can be inserted into the Main Media Data by using the reverse send feature.
For more information, see:
Importing Data into a Project List
|
 You will notice two columns. The Publicity Assistant fields are in the
right-hand column and the imported file fields are in the left-hand column. To
import this data, match the fields in the left-hand column (that is the fields you
wish to import) with the Publicity Assistant fields in the right-hand column by
dragging the buttons to the left up or down, so that first name is next to
first name, last name is next to last name, etc. You will need to insert bank
fields in order to align fields properly. To do this, drag a blank from the bottom
of the column and place it next to a field that is not occupied. When you
have all the fields aligned properly. Press the import button located at the top
left corner and the contacts will be added to your project list. These
imported contacts can be inserted into the Main Media Data by using the reverse send feature.
For more information, see:
Importing Data into a Project List