Designing Mail Merge Letters
Designing Mail Merge Letters
Mail merge allows you to send the same letter to an entire list of people, and
change certain items in the letter for each person. For example, you can send
a letter to 100 people in a Review List, and the address will automatically
change for each letter. To design a mail merge letter you combine written text
(i.e. the body of the letter), with special fields, which indicate where the
contact’s name goes, where there address goes, etc. To design a new mail merge
letter, open the project you wish to use and follow these steps:
- Press the Output button on the Toolbar.
- Select the Mail merge option.
- A list of your mail merge documents will appear. You may create a new mail
merge document from scratch, base your mail merge on an existing document, or use
an existing document. To edit an existing document, skip to step 5.
- To create a brand new mail merge document, press the Add button in the
Toolbar. A new mail merge document will appear called “Blank Letter”, highlighted in yellow. To change the name, click in the field and enter the
new name.
- To base a new mail merge document off of an existing one, drag that document
to any other line in the Output window. A duplicate will appear highlighted in
yellow. To change the name, click in the field and enter the new name.
- Double click on the mail merge document you would like to edit (or if you
created a new document, double click on that). A window will appear asking you, “Do you want to rename the mail merge letter?” Select yes and press the enter key.
Two windows will appear side-by-side, with Word on the Left, and a Publicity
Assistant 2000 window on the right. In the Publicity Assistant window, there
will be a list of all available fields for your mail merge.
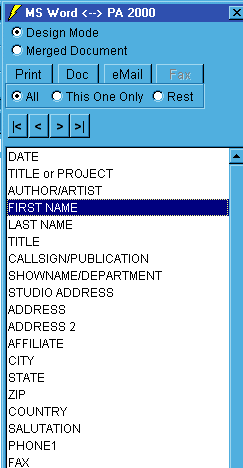
- Select design mode.
- Type your mail merge document into the Word Document and insert Publicity
Assistant merge fields as needed. For example, to create a confirmation letter,
you may start with “Dear CONTACT”. Type “Dear” into Word and space, then to insert the FIRST NAME merge field from the list on the right, click on FIRST NAME once to select and double-click to insert.
- After you have finished designing your mail merge letter, select the merge
document button. You can now page through your letters, using the red arrow keys
on your word toolbar. This allows you to see the fields that have been merged
from Publicity Assistant 2000 into the word document.
- When you are done editing your mail merge document, close the mail merge
design session by clicking in the top right corner of the Publicity Assistant window
on the right. This will automatically save your session.
For more information, see:
Generating Mail merge Letters
Generating Confirmation Letters
Sharing Mail Merge Letters
|