Publishing Version |
Publishing Version |
Duplicate Checking the Main MediaWhen adding new contacts to the Publicity Assistant 2000 Main Media Data, users may inadvertently enter information that already exists (see Adding a Contact for ways to prevent this). The Publicity Assistant Dupe Checker helps you easily identify and eliminate duplicate records. To access the Duplicate Checker, select the Tools tab of the Publicity Assistant main window. You will notice a button titled “Duplicate check”, with a slide-bar and a small blue window to the right. Before checking your Main Media Data for duplicates, you must first indicate how strict Publicity Assistant 2000 should be in identifying duplicates. For example, do you want to consider any contacts with the similar Callsigns as duplicates? Or should records be nearly identical to be considered duplicates. Use the “Similarity slide-bar” to the right of the Duplicate Check button to make your selection. As you move the slide bar, the blue window below it will indicate what is to be considered a duplicate. The further to the right you move the bar, the more similar records must be for them to be considered dupes. We recommend you select one of the two rightmost settings for your duplicate checks. After selecting the similarity level, press the Duplicate Check button. Note that depending on the size of your database and the speed of your network, this could take from between several seconds to several minutes, and the process cannot be interrupted mid-stream. Once Publicity Assistant has located the duplicates in your system, it will display them side-by-side, as shown in figure 1: Figure 1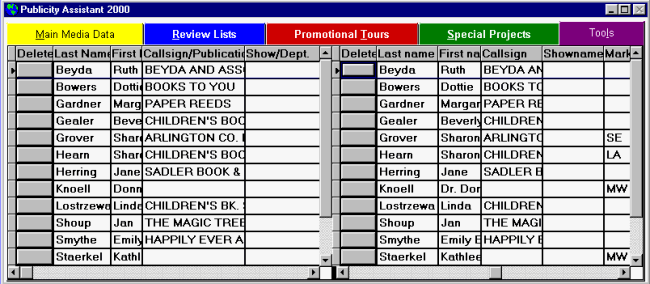 Along with the window in figure 1, the Publicity Assistant Duplicate Handler
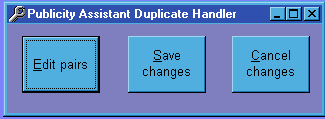
(figure2) also appears, at the bottom of your window:
Figure 2
Along with the window in figure 1, the Publicity Assistant Duplicate Handler
(figure2) also appears, at the bottom of your window:
Figure 2
 As shown in figure 1 above, each row in the main Publicity Assistant window
represents a pair of duplicate records, based on the criteria you outlined above.
To delete one of the duplicates, simply click the check box in the delete
column.
Frequently, you will want to see a more detailed display of the duplicate
records. For that reason, we have created the Edit Pairs option. Pressing the
Edit Pairs button on the Publicity Assistant Duplicate Handler brings up the
following screen:
Figure 3
As shown in figure 1 above, each row in the main Publicity Assistant window
represents a pair of duplicate records, based on the criteria you outlined above.
To delete one of the duplicates, simply click the check box in the delete
column.
Frequently, you will want to see a more detailed display of the duplicate
records. For that reason, we have created the Edit Pairs option. Pressing the
Edit Pairs button on the Publicity Assistant Duplicate Handler brings up the
following screen:
Figure 3
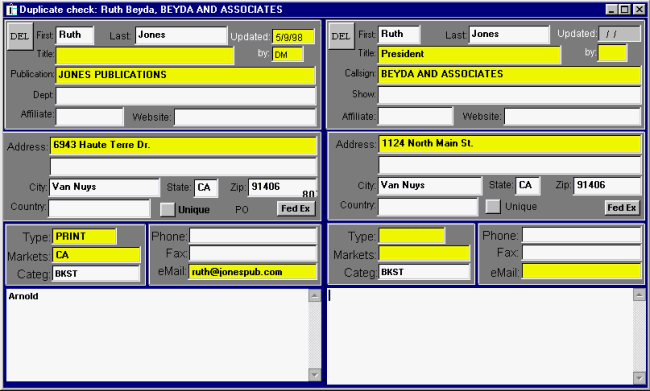 Differences in the records are highlighted in yellow. You can easily move
data from one record to the other by dragging the appropriate field. For
instance, in the sample above, you could drag the Title field from the record on the
right to the record on the left. The record on the left would then display “President” as the title, and that field would change from yellow to white, indicating
that they are no longer different. This feature allows you to mix and match
fields.
Codes, phone numbers, faxes and emails are combined through a different
technique. When you select a record to delete, Publicity Assistant allows you to
combine codes, phones, faxes, and emails. A prompt will appear asking you which
you would like to combine.
When you are done with the current record, the page down and page up buttons
will bring you to the next or previous records. You may also use the previous
and next buttons on the toolbar to move between records.
When you are finished editing pairs, if you close the editing pairs window,
you will see the grid from figure 1, with check marks indicating which records
you selected for deletion. To finalize your deletions, press the “Save Changes” button on the Publicity Assistant Duplicate Handler. To cancel your
deletions, press “Cancel Changes.”
Hint: To view a specific pair of records in the Edit Pairs window, scroll down to
that pair in the grid (figure 1). Click once on the record, and then select
the Edit Pairs button on the Duplicate Handler.
Differences in the records are highlighted in yellow. You can easily move
data from one record to the other by dragging the appropriate field. For
instance, in the sample above, you could drag the Title field from the record on the
right to the record on the left. The record on the left would then display “President” as the title, and that field would change from yellow to white, indicating
that they are no longer different. This feature allows you to mix and match
fields.
Codes, phone numbers, faxes and emails are combined through a different
technique. When you select a record to delete, Publicity Assistant allows you to
combine codes, phones, faxes, and emails. A prompt will appear asking you which
you would like to combine.
When you are done with the current record, the page down and page up buttons
will bring you to the next or previous records. You may also use the previous
and next buttons on the toolbar to move between records.
When you are finished editing pairs, if you close the editing pairs window,
you will see the grid from figure 1, with check marks indicating which records
you selected for deletion. To finalize your deletions, press the “Save Changes” button on the Publicity Assistant Duplicate Handler. To cancel your
deletions, press “Cancel Changes.”
Hint: To view a specific pair of records in the Edit Pairs window, scroll down to
that pair in the grid (figure 1). Click once on the record, and then select
the Edit Pairs button on the Duplicate Handler.
|