Creating Labels/Mailing Lists
Creating Labels/Mailing Lists
Once you have entered a group of contacts into a project, you may elect to
create mailing labels. These can be used to ship copies of books, press releases,
etc. Publicity Assistant 2000 allows you to track which contacts have
received a mailing. It also allows you to specify what they are to receive (i.e. a
press release, a bound galley book, etc.). The following example gives you the
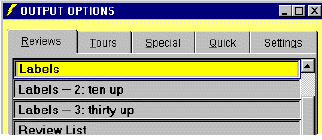
output options for printing Review Lists.
To create mailing labels, follow these steps:
- Select the project you are working on by clicking on it once in the main
window. For example, if you would like to print mailing labels for your Review List
titled Cold Mountain, select the Review List tab in the main window. Then click once on Cold Mountain.
- Press the OUTPUT button on the toolbar. The Output Options window will
appear.

- In the Output Options window, double click on Labels. Note: If your system
is set up with multiple label types, the Output Options window will allow you to
select which type you’d like to print. Double click on your choice.
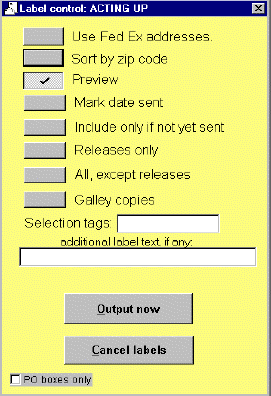
- The Label Control dialogue box will appear. You now must choose which options
you would like. To select or unselect an option, click on it with your mouse.
The options are:

- Use Fed Ex addresses: Check this box if your labels cannot be addressed to PO Boxes. Many contacts
have both a PO Box address, and a physical address. If a contact has been
designated as having both, the physical address will be chosen. This option is
necessary for most shipping companies, such as Federal Express and UPS.
- Sort by zip code: If you would like your labels sorted by zip code, check this box.
- Preview: To preview your labels, check this box. You will have the option of
printing directly from the preview screen.
- Mark date sent: Publicity Assistant 2000 can track which of your contacts in a project have
been sent a mailing. If you would like the recipients of this mailing list to
be tagged as such, check this box.
- Include only if not yet sent: If you have marked a contact as having been sent a mailing, you may not wish
to mail to them again. If so, check this box. This is useful when your list
is constantly growing. For example, suppose that in the Cold Mountain project you had an original list of 9 contacts. You sent each of them a book
on January 8. On January 15, you decide to add 6 more contacts to your
project. If you selected Mark Date Sent for the original 9, then select Include only if not yet sent, only the 6 new contacts will be sent a book.
- Releases only: In your projects, you have the option of indicating whether a contact should
receive a press release. If you check this box, labels will be created only
for those contacts you indicated should receive a release.
- All, except releases: Check this box if you want to mail to all of your contacts that are not tagged to receive press releases. For example, suppose your project has 20
contacts. You have indicated that 10 will receive press releases. You do not
want those 10 to also receive the book. If you check this option, labels will
only be created for those contacts not marked for press releases. You can then
use the labels for mailing the books.
- Galley copies: In your projects, you have the option of indicating which contacts should
receive bound galley copies of books. To create a bound galley mailing list, you
would check this box, and only those contacts selected to receive bound galley
copies would show up on the mailing labels.
- Selection tags: For each contact, you have the option of creating tags. These can be used for
personal use, or can be designated by your organization to have certain
meaning. For instance, you may determine that “A” means author requests for a book. If you tagged a contact as “A”, you can choose to print mailing labels for all contacts tagged with an “A.” If you want to specify which selection tags should be included in a set of
mailing labels, enter those tags here. Note that you can include multiple
selection tags.
- Additional label text: In this space you have the option to put account numbers or any other message.
- P.O. Box Only: check this box if you only want to print labels for addresses that contain
P.O. Boxes.
- Press the Output now button.
- If Preview was checked, you will be shown a preview of the labels. You can
then elect to print them by pressing the printer icon. If Preview was not
checked, your labels will be sent directly to the printer.
|