Using Publicity Assistant Mail
Merge with Word
To perform mailmerges with Publicity Assistant 2000 and Microsoft Word, you must first create mailmerge documents or confirmation letters. You must then
output your project (see Generating Mail Merge Letters) using
one of these mailmerge or confirmation letters.
Once you are in Word, you will have access to the Word Mailmerge Toolbar:
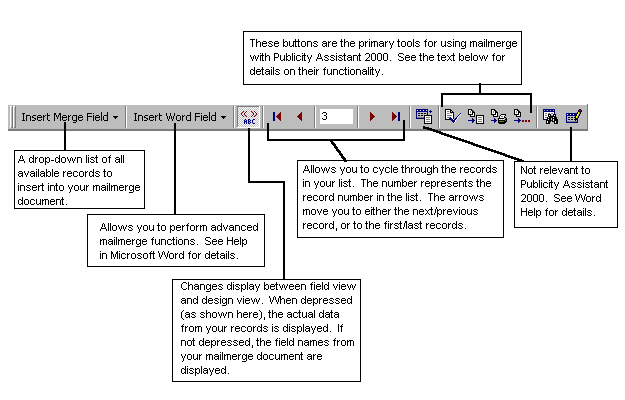
At this point, you may edit your mailmerge document by using the merge fields (see Mailmerge Design Mode) and by typing in
text directly.
When you are ready to merge, you have three main options:
- Merge the letter into a single document. This creates a single document
consisting of a letter to each contact. For example, if your letter is 2 pages long, and
you have 50 contacts, this will create a single 100 page document, consisting of 50 2-page
letters. This allows you to make slight modifications to each letter (i.e. to add more
personalization) before print them out. The result is a normal Word document, which you
edit, print, etc. like any other Word document.
- To do this, press the “Merge to New Document” button on the mailmerge toolbar
(
 ). Alternatively,
in the Tools menu of Word, select “Mail Merge…” then choose
“Merge” next to step 3. A “Merge to” window will appear. In the drop
down menu, select New Document, then press the Merge button. A new document will be
created. ). Alternatively,
in the Tools menu of Word, select “Mail Merge…” then choose
“Merge” next to step 3. A “Merge to” window will appear. In the drop
down menu, select New Document, then press the Merge button. A new document will be
created.
- Merge the letter into separate documents. This allows you to output all of your
letters to a printer, a fax (for blast faxing). or any other output device which you have
properly configured.
- To do this type of merge, press the “Merge to Printer” button on the mailmerge
toolbar (
 ). Select
the printer or fax machine you desire, then press OK. Alternatively, in the Tools menu of
Word, select “Mail Merge…” then choose “Merge” next to step 3. A
“Merge to” window will appear. In the drop down menu, select the appropriate
device, and then press the Merge button. Follow the on-screen prompts. ). Select
the printer or fax machine you desire, then press OK. Alternatively, in the Tools menu of
Word, select “Mail Merge…” then choose “Merge” next to step 3. A
“Merge to” window will appear. In the drop down menu, select the appropriate
device, and then press the Merge button. Follow the on-screen prompts.
- Check the merge document for errors. If for any reason you are concerned about
the integrity of your data, or if you have selected advanced merge options (such as
conditional logic), you may wish to check your merge document for errors. To do this,
press the “Check for Errors” button on the mailmerge toolbar (
 ). ).
For more information on using mailmerge with Publicity Assistant 2000, see:
 Generating Mailmerge Letters Generating Mailmerge Letters
Designing Mailmerge Letters
Printing Confirmation Mailmerge Letters |